

Easter Egg Suncatcher Craft Tutorial: Free Printable Template


Make an Easter egg suncatcher with this easy kid craft using tissue paper and a free printable template. A quick, mess-free way to add festive fun at home.

Easter Egg suncatcher crafts are one of those simple wins that make a regular afternoon feel a little magical, you know. They are colorful. They are easy. And they keep little hands busy without wrecking the whole house.
This is the kind of craft you pull out when you want something festive but low effort. No glitter explosions. No fancy tools. Just a cute result that looks way harder than it actually is.

What this craft is all about
This project is a bright window decoration made with tissue paper and contact paper. Light shines through the colors and makes the egg glow. Kids think it’s magic. Moms know it’s science… or luck.
It uses a printable egg shape, simple supplies, and very forgiving steps. That means it works for toddlers, preschoolers, and even older kids who want to get fancy with patterns.
Best part. You probably already have most of the supplies at home. If not, a quick trip to the craft aisle has you covered.

Why you’ll love this idea
First, it is fast. You can prep everything in about ten minutes. That matters on busy weekdays when dinner is coming fast and patience is running low. This craft fits perfectly between snack time and screen time.
Second, it is mess-friendly. Tissue paper stays put. Contact paper does the hard work. There is no paint dripping onto the table or glue stuck in hair. That alone makes it a mom win.
Another reason this craft works so well is flexibility. Kids can choose colors, create patterns, or go totally random. Every finished piece looks different. That means no fighting over whose looks better.

Why this project is perfect for the Easter season
Spring light is everything. When the sun starts shining again, window crafts finally get their moment. These colorful eggs catch the light in the morning and glow in the afternoon.
Easter celebrations often come with sugar overload. This craft balances things out with quiet creativity. It gives kids something fun to focus on while you sip your coffee and feel slightly accomplished.
It also fits right in with Easter themes like pastel colors, eggs, and new beginnings. Whether you decorate for a party or just want seasonal fun, this project checks all the boxes.

Contains affiliate links for your convenience; learn more and see our full disclosure policy here. As an Amazon Associate I earn from qualifying purchases.
How to make an Easter Egg Suncatcher
Materials you’ll need

Shop everything you need to make these adorable stained glass style Easter Egg Suncatchers by clicking the images to learn more:

Step-by-step instructions
Start by downloading and printing the egg template. You’ll do this by entering your email address in the dark green download box at the end of the post. The PDF file template will be sent to your inbox. Quick and easy.
Next, cut the egg shape out of black construction paper. This creates a bold outline that really makes the colors pop once the light hits. Scissors work, but the triangles can be cut out with an Exacto Knife to make it easier.

Then, cut the tissue paper into small squares. Don’t stress about perfection here. Uneven edges still look great once everything overlaps.

After that, attach contact paper to the back of the egg shape. Peel the backing off so the sticky side faces up. This is where the magic happens.


Now comes the fun part. Let your kids place tissue paper squares onto the sticky surface. Use one color per section. This keeps things organized and looks super polished. Or let them go wild and do it however they like!

Once the entire egg is covered, you can add another layer of contact paper on the back. This step is optional, but it helps seal everything in place.

Finally, trim off any excess contact paper. Hang the finished piece in a sunny window and admire your work. Instant Easter decor.

How to use this craft at home or school
This craft works great as an afternoon activity after school. It also fits nicely into homeschool lessons about colors or light. Teachers love it for classroom decorations that feel personal.
You can also use it as a quiet activity during Easter gatherings. Set up a small craft station and let kids create while adults chat. Everyone wins. Pair it with my other suncatcher crafts, I have a snowflake, snowman, heart, shamrock, and rainbow!
Another idea is gifting. These make sweet handmade decorations for grandparents. Slip one into a card and call it an Easter surprise.

Fun variations to try
Here are a few crafting ideas to use this craft:
- Change up the color theme. Pastels feel classic, but bright rainbow colors look amazing in sunlight.
- Use patterned tissue paper for extra texture. Kids love seeing dots and stripes glow.
- Try different sizes. Small eggs work well for garlands. Larger ones make bold window statements.
- Add names with a marker once finished. Personalized crafts always feel extra special.

Common questions about this craft
What age is this best for?
Toddlers can help place tissue paper with supervision. Preschoolers and up can do most steps alone. Older kids can do it from start to finish.
Do I need contact paper?
Contact paper works best, but clear packing tape can work in a pinch. Lay down a piece of wax paper and add tape to the template in lines. Then remove from wax paper and place sticky side up.
How long does it last?
These hold up for weeks in a window. Store flat if you want to reuse next year.
Can I laminate it?
Lamination is not needed. Contact paper already does the job.

My Favorite Printable Supplies:
Contains affiliate links for your convenience; learn more and see our full disclosure policy here.
- Printer: I love my HP Home Printer, it prints beautifully everytime no matter what projects I am working on.
- Paper: Depending on the durability you want with your printables, consider printing on white card stock or high quality paper.
- Laminator: For printables you are planning to use over and over again, simply laminate and use dry erase markers to mark up the printables.
- Paper Cutter: I love my CARL Paper Cutter. It makes trimming and cutting out printables a breeze.
- Sticker Paper: When printing tags or other free printables, sticker paper can make it easy to attach to gifts, boxes, or to make your own stickers.
- Cutting Supplies: You’ll want a great pair of paper cutting scissors and I love using an Xacto Knife for intricate details.
- Pens and Coloring Supplies: Here are some of my favorite writing tools for pencils and pens. Coloring supplies that I love to use in my own home: colored pencils, crayons, markers for adults, and markers for kids.

Download the Easter Egg Suncatchers Template Here
Please remember my printables are free for classroom use or personal use only. You may not sell or distribute the printable or digital file. If you wish to share the digital files, please refer friends to the link of this blog post where they can sign up to receive the free printable directly in their inbox.
Be sure to check your printer settings before printing, I generally make sure that the scale to fit option is selected to make sure all of the printables fit on the page.
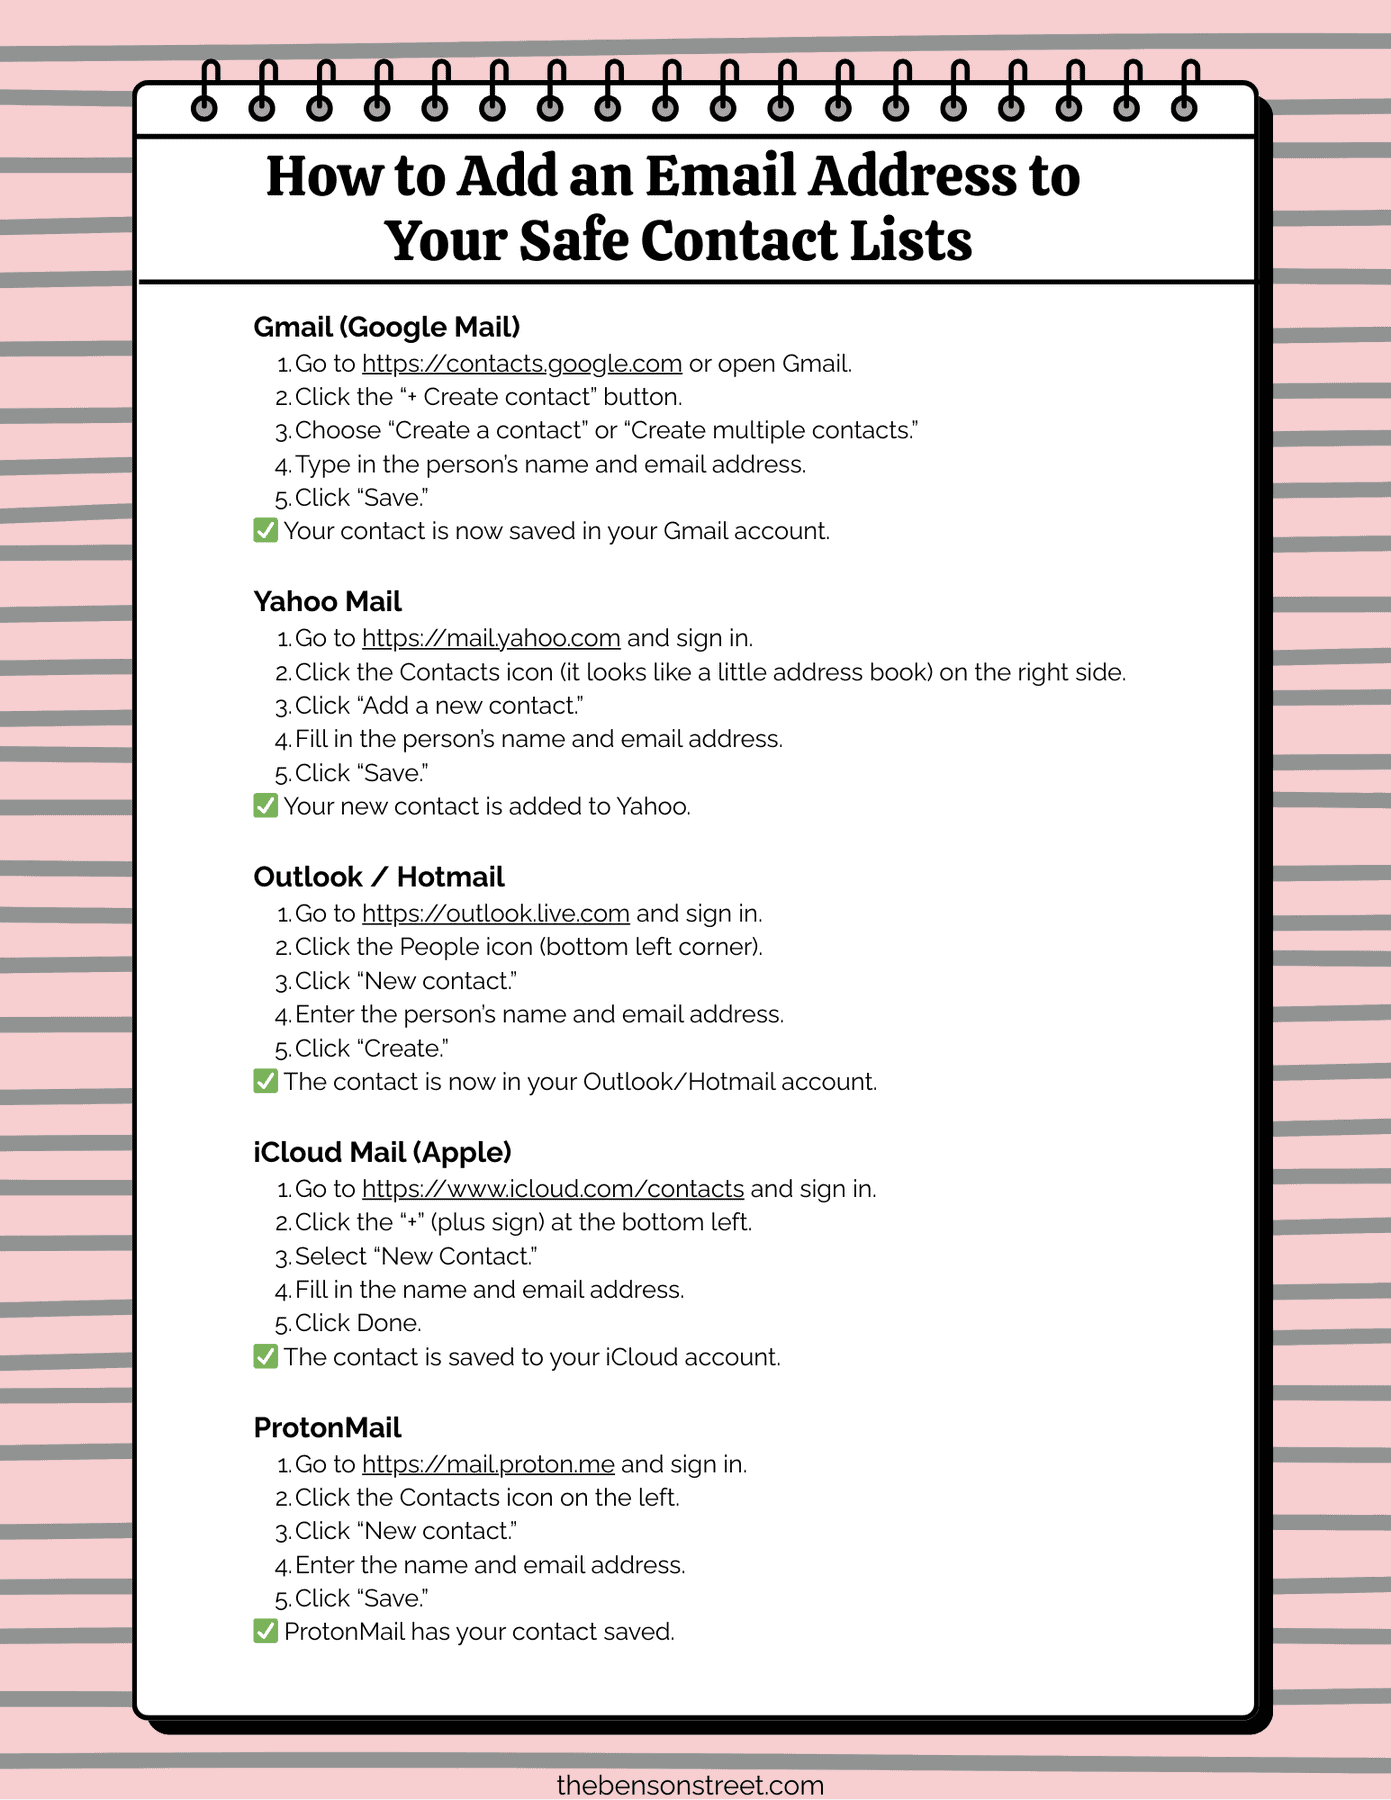
To ensure emails for printables are received in your inbox add hello@thebensonstreet.com to your email contacts. Also check your promotions, updates, spam, junk or other folders if you do not see the email in inbox. Also for educators, consider using your personal email as many school districts block the emails or downloading of files.

Easter Egg Suncatcher Craft
Materials
- Tissue paper
- Packing tape or contact paper
- Scissor
- Construction paper
Instructions
- Download and print the Easter Egg template by entering your email address in the dark green download box at the end of the post below.
- Cut the easter egg template out of black paper.

- Cut squares from the tissue paper colors.
- Attach contact paper to the easter egg then attach the tissue papers until you covered the entire template. Using one color in each section of the template.
- Optional: Add another layer of contact paper to the back side.
- Cut the excess contact paper from the template.
- Hang in a window to display.


Final thoughts on making an Easter Egg Suncatcher
This Easter Egg suncatcher is one of those crafts that checks all the boxes. It is easy. It is cute. And it makes your home feel festive without extra stress.
If you love simple seasonal ideas like this, grab the free template in the dark green download box above. Then hang your finished craft in the window and enjoy the glow.
Stick around for more easy holiday fun, printables, and recipes made for busy moms. Let’s make everyday moments feel special together. 🌸🥚
More Easter Ideas:
Please pin this post for later and follow along on Pinterest:


Hi there!
I’m Emily, a mom and wife with a passion for crafting, celebrating holidays, and creating memorable moments. From Idaho to the world, The Benson Street is a treasure trove of easy, fun DIY projects, delightful printables, and delicious recipes. With over a decade of experience in blogging and a love for all things seasonal, I’m here to share my tips, ideas, and occasional mishaps. Join me in adding a dash of joy and creativity to every day! Read more…

