

How To Make A Popsicle Stick Pumpkin Craft for Kids

Easy pumpkin popsicle stick craft for kids! A quick fall and Halloween activity that’s fun, affordable, & keeps little hands busy with no stress. Make it now!

Looking for a simple fall activity that keeps the kids busy and adds some festive fun to your home? This pumpkin popsicle stick craft is the cutest little project. It’s quick, budget-friendly, and perfect for fall decorating or even as a classroom craft.
What is a Pumpkin Popsicle Stick Craft?
This craft is exactly what it sounds like—a pumpkin made out of popsicle sticks. With just a little paint, paper, and glue, you can turn simple sticks into an adorable pumpkin decoration. Kids can even add a jack-o’-lantern face for Halloween.
It’s one of those crafts you can pull together in less than 30 minutes. And the best part? You probably already have the supplies at home.

Why You’ll Love This Idea
First, it’s low mess and low stress. No glitter explosions or complicated instructions. Just paint, glue, and a few simple cutouts. That means you can set it up quickly while sipping your pumpkin spice latte.
Second, it’s versatile. These little pumpkins can become fridge magnets, classroom door decorations, or even part of your Thanksgiving table centerpiece. They’re seasonal, fun, and they won’t take over your house like some of those bigger craft projects.

Why This Project is Great for Kids
This craft is perfect for little hands. Kids get to paint, cut, and glue—three favorite activities in one. It’s also a fun way to work on fine motor skills while keeping them entertained.
And because pumpkins are so forgiving, there’s no “wrong way” to make one. Some might look tall, some short, some a little lopsided (kind of like real pumpkins in the patch on vines). That’s part of the charm.

Contains affiliate links for your convenience; learn more and see our full disclosure policy here. As an Amazon Associate I earn from qualifying purchases.
Popsicle Stick Pumpkin Craft Supplies
- Popsicle sticks (3 per pumpkin)
- Orange paint
- Paintbrush
- Scissors
- Glue
- Orange, brown, and green paper
- Colored pencils
- Black marker
- Free Printable Template, download at the bottom of the post (or you can freehand the stem and leaves)

Shop all of the items I used to make this craft by clicking the images below:

How to Make a Pumpkin Popsicle Stick Craft
- Paint three popsicle sticks orange. Let them dry completely.
- Glue the mini craft sticks together to form a triangle shape.
- Cut a triangle from orange paper, the same size as your popsicle stick triangle. Glue it to the back to fill in the pumpkin.
- Cut out a stem from brown paper and a leaf from green paper. Glue them to the top of your pumpkin.
- Draw vertical lines with a green colored pencil to give your pumpkin some texture.
- Add a face with a black marker if you want a jack-o’-lantern look.
Ta-da! You’ve got yourself the cutest little pumpkin. 🎃


Variations for the Craft
Want to mix things up? Here are some ideas your kiddo can try:
- Add googly eyes for a silly pumpkin.
- Use glitter glue for the leaf if you’re brave.
- Make a whole pumpkin patch by creating different sizes with mini popsicle sticks.
- Paint them white or teal for trendy farmhouse vibes.
- Add a magnet on the back for a cute fridge decoration.

How to Use This Craft
This little pumpkin craft has so many uses. You can:
- Add it to your fall mantle display.
- Send it as a gift to grandparents.
- Use it as a name card holder for Thanksgiving dinner.
- Create a classroom bulletin board full of pumpkins.
- Let kids make them as party favors for a fall festival.
Parents often search for “easy fall crafts for kids” or “pumpkin crafts for preschool,” and this one checks all the boxes. It’s cute, quick, and makes the holiday season feel special.

Common Questions About Pumpkin Popsicle Stick Crafts
Do I need special supplies?
Nope! Just standard popsicle sticks, paint, glue, and paper.
Can younger kids do this?
Yes! Preschoolers can paint and glue while you help with cutting. Older kids can do the whole thing on their own.
How long does it take?
About 20–30 minutes, depending on drying time.
Can I use this in a classroom?
Absolutely. Teachers love this project because it’s easy, budget-friendly, and works well for large groups.

My Favorite Printable Supplies:
Contains affiliate links for your convenience; learn more and see our full disclosure policy here.
- Printer: I love my HP Home Printer, it prints beautifully everytime no matter what projects I am working on.
- Paper: Depending on the durability you want with your printables, consider printing on white card stock or high quality paper.
- Laminator: For printables you are planning to use over and over again, simply laminate and use dry erase markers to mark up the printables.
- Paper Cutter: I love my CARL Paper Cutter. It makes trimming and cutting out printables a breeze.
- Sticker Paper: When printing tags or other free printables, sticker paper can make it easy to attach to gifts, boxes, or to make your own stickers.
- Cutting Supplies: You’ll want a great pair of paper cutting scissors and I love using an Xacto Knife for intricate details.
- Pens and Coloring Supplies: Here are some of my favorite writing tools for pencils and pens. Coloring supplies that I love to use in my own home: colored pencils, crayons, markers for adults, and markers for kids.

Download Template Here
Please remember my printables are free for classroom use or personal use only. You may not sell or distribute the printable or digital file. If you wish to share the digital files, please refer friends to the link of this blog post where they can sign up to receive the free printable directly in their inbox.
Be sure to check your printer settings before printing, I generally make sure that the scale to fit option is selected to make sure all of the printables fit on the page.
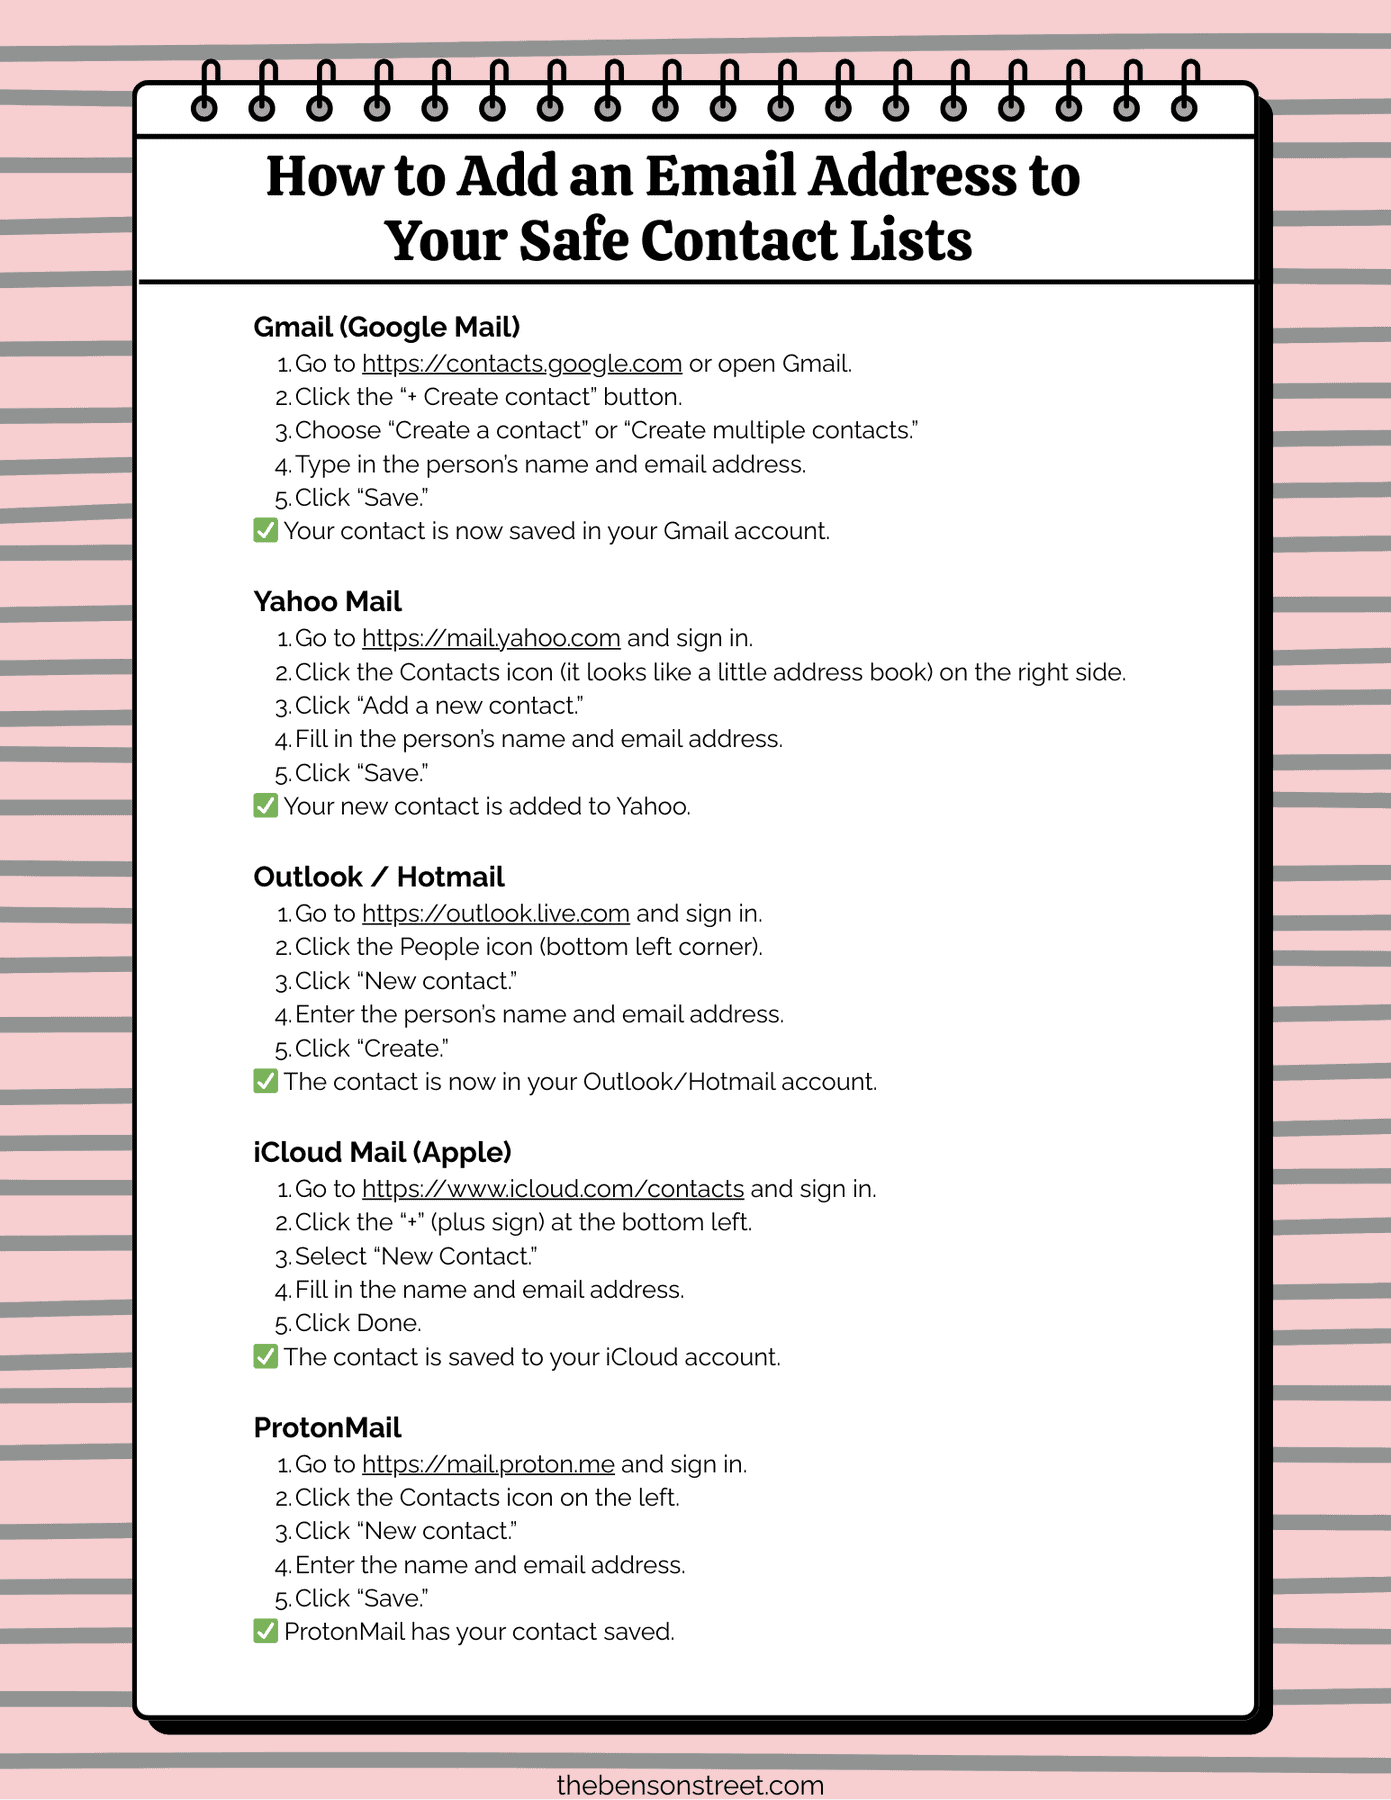
To ensure emails for printables are received in your inbox add hello@thebensonstreet.com to your email contacts. Also check your promotions, updates, spam, junk or other folders if you do not see the email in inbox. Also for educators, consider using your personal email as many school districts block the emails or downloading of files.

Popsicle Stick Pumpkin Craft
Materials
- Popsicle sticks
- Orange paint
- Paint brush
- Scissors
- Glue
- Markers
- Construction paper orange, green, brown
- colored pencils
Instructions
- Paint three popsicle sticks orange. When they are dry, assemble them in a triangle.

- Cut a triangle from an orange paper (or color the triangle orange) the same size as the popsicle stick triangle, then attach it to the back of the popsicle stick.
- Cut the stem and leaf template and trace them to a brown and green paper and attach them at the tip of the triangle.
- Draw vertical lines using a colored pencil.
- Lastly, draw the details of the face using a marker.


Conclusion
Fall crafts don’t need to be complicated. This simple pumpkin popsicle stick craft is a fun way to get kids excited about the season while giving you a moment of peace.

Grab your popsicle sticks, let the kids paint, and make a whole pumpkin patch together. You’ll end up with sweet little decorations and even sweeter memories.
👉 Ready to make your own? Print out the instructions, gather your supplies, and start crafting today!
More Fun halloween Crafts:
- Paper Plate Mickey Mouse Pumpkin Craft
- Paper Plate Hedwig Owl Craft
- Halloween Craft Blocks
- Apple Popsicle Stick Craft
- Frankenstein Popsicle Stick Craft
Please pin this post for later and follow along on Pinterest:


Hi there!
I’m Emily, a mom and wife with a passion for crafting, celebrating holidays, and creating memorable moments. From Idaho to the world, The Benson Street is a treasure trove of easy, fun DIY projects, delightful printables, and delicious recipes. With over a decade of experience in blogging and a love for all things seasonal, I’m here to share my tips, ideas, and occasional mishaps. Join me in adding a dash of joy and creativity to every day! Read more…

